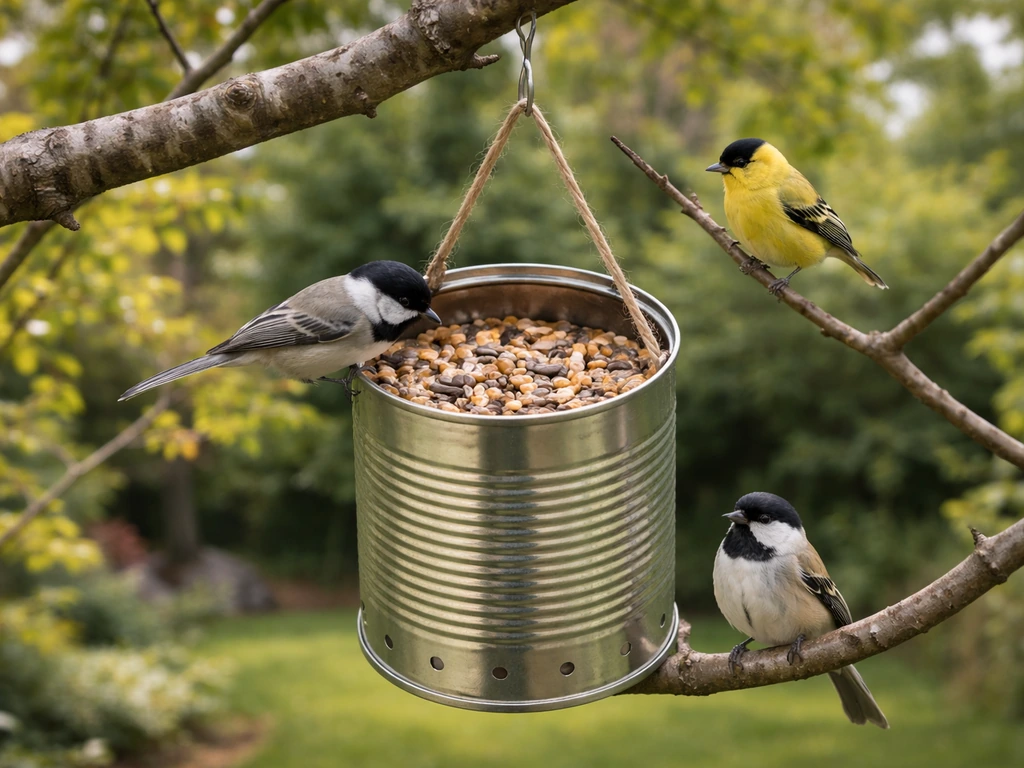
You can turn a standard metal coffee can into a working bird feeder in about 30 minutes with a few basic tools, and birds will absolutely use it. Cut one or two feed openings near the open end, add drainage holes at the bottom, smooth the edges, hang or mount it, and fill it with seed. That's the core of it. The rest of this guide is about doing it well: safe edges, weather protection, smart placement, and knowing which birds will actually show up.
Coffee Can Bird Feeder Plans: Build, Hang, and Troubleshoot
Marcus Hendricks
1 May 2026
Why a coffee-can feeder is worth building
The honest appeal here is speed and cost. A 39-ounce or larger metal coffee can costs nothing if you're already drinking the coffee, and the build takes less than an hour. If you're just getting started with backyard bird feeding and aren't ready to spend $30–$80 on a commercial hopper or tube feeder, a coffee can lets you test the hobby for nearly zero dollars. It also makes a solid project to do with kids.
Metal cans hold up better than you might expect. They're sturdier than a plastic coffee can feeder or a Pringles can feeder, and they shed water reasonably well if you orient them correctly. The trade-off is rust over time, which we'll cover in the materials section. For a seasonal or supplemental feeder, the coffee can earns its keep easily.
Where DIY makes less sense: if you're in a high-squirrel area, dealing with persistent rats, or want to attract a specific species that needs a precise port size or feeder style, a commercial feeder will serve you better. That comparison comes at the end of the article, but keep it in the back of your mind as you read.
Coffee-can feeder design options and plans
There are three basic configurations that work well, and your choice depends on what birds you want to attract and how you plan to mount it.
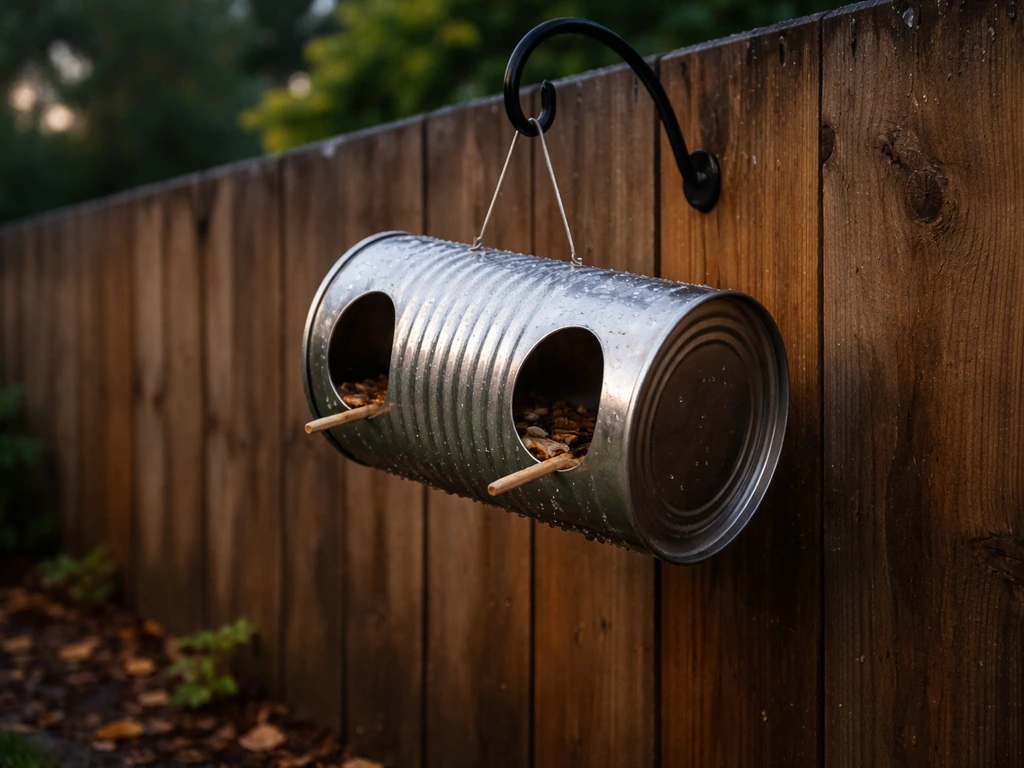
Option 1: Side-port feeder (horizontal hang)
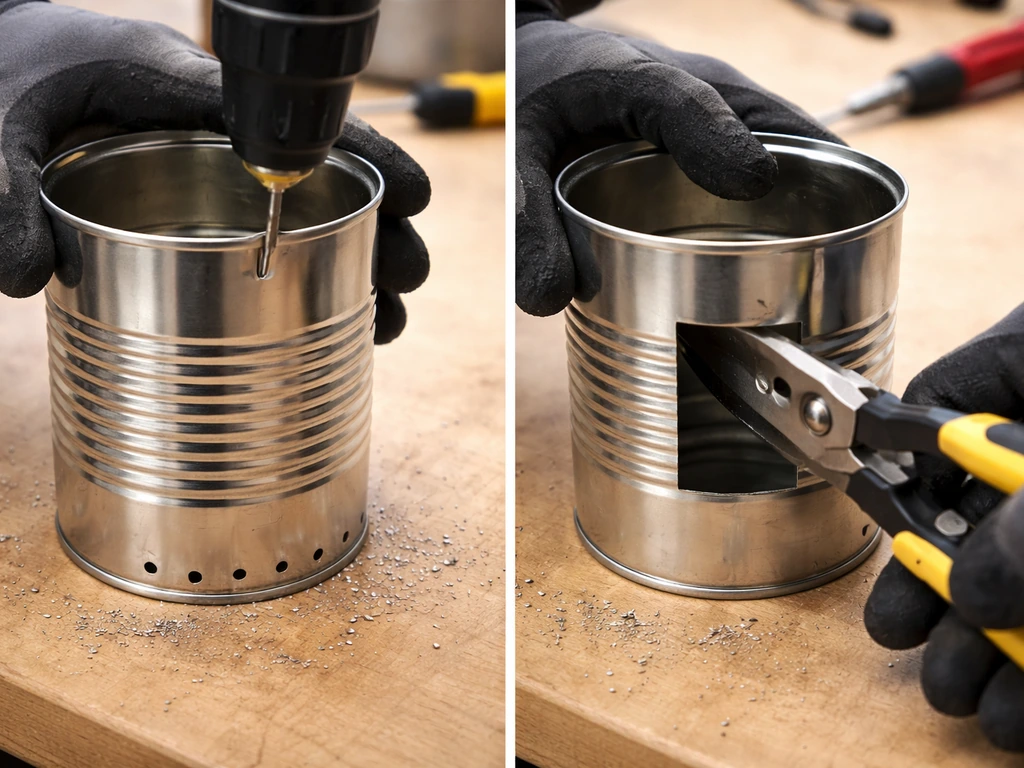
This is the most common coffee-can design. Leave the lid on, hang the can on its side, and cut one or two rectangular openings (about 1.5 inches tall by 2 inches wide) on the upper half of the can's side face. These openings act like the ports on a hopper feeder. Seed sits in the lower half, and birds perch at the opening to feed. Punch 4–6 small drainage holes (3/16 inch) in what is now the lowest point of the can. Add a wooden dowel (1/4 inch diameter) below each port as a perch, running it through both sides of the can so it's stable.
Option 2: Open-top platform style (vertical mount)
Remove the lid entirely, mount the can upright on a post or flat surface, and use it as a small open platform feeder. This attracts ground-feeding birds like juncos, sparrows, and doves that prefer open access over a tight port. The downside is total weather exposure, so you'll need to empty and dry it after rain. Cut several drainage holes in the bottom and consider bending the top rim slightly outward so it's smooth for birds to land on.
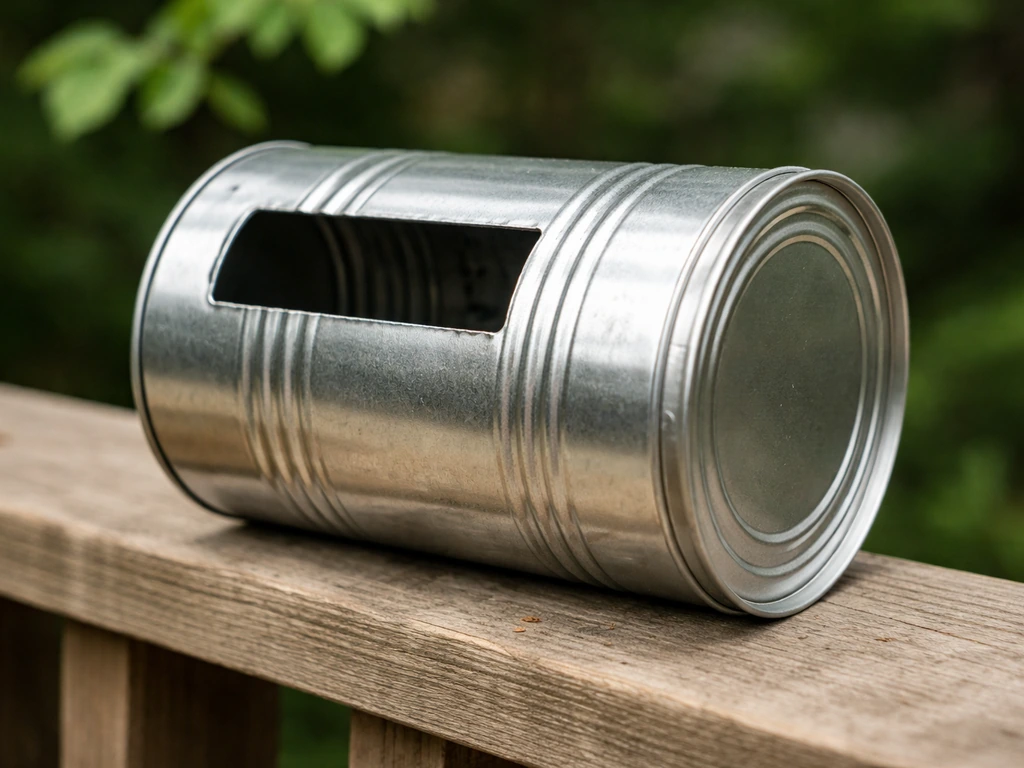
Option 3: Enclosed hopper with gravity feed (advanced build)
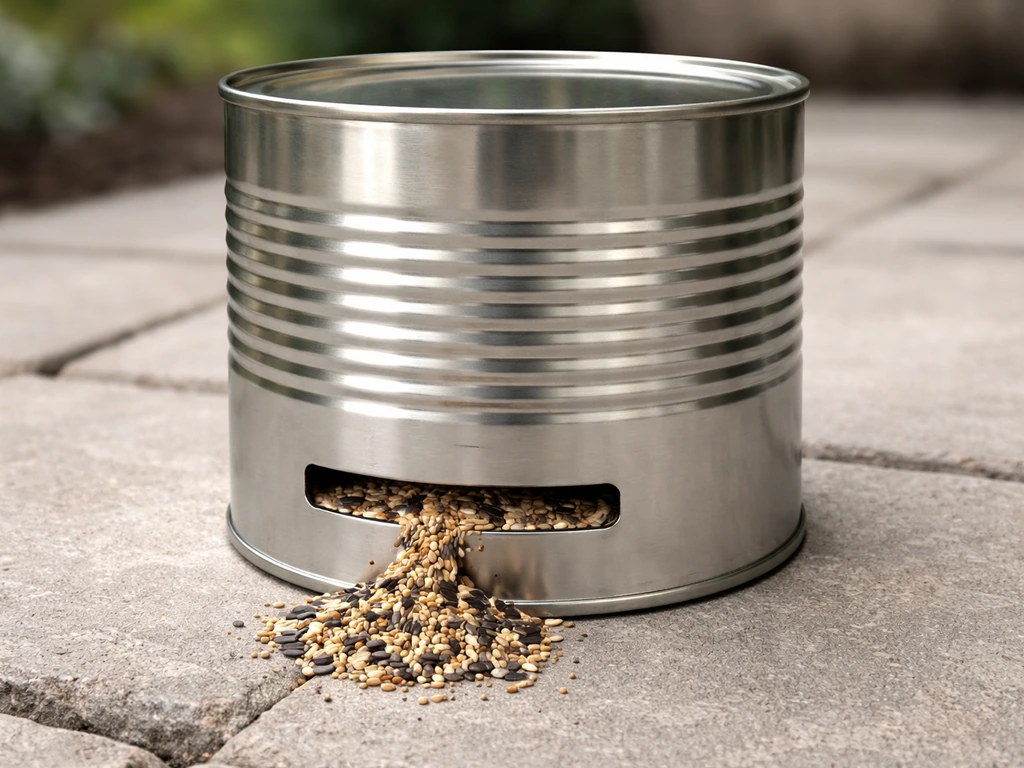
Use a large 39-ounce or family-size can. Cut a narrow slot (about 3/4 inch tall, running 3 inches wide) near the bottom edge of one side. Seed flows down by gravity as birds eat, similar to a tube feeder. Keep the lid on to protect the seed from rain. This design holds more seed and keeps it drier, but the narrow slot limits which birds can access it. Finches and chickadees handle it easily; larger birds like cardinals will struggle.
Hanging vs. pole mounting
For hanging, punch two holes near the sealed end of the can, thread 18-gauge galvanized wire through them, twist it securely, and hang from a hook or shepherd's crook. For pole mounting, drill or punch four holes near the bottom of the can and use zip ties or wire to secure it to a 3/4-inch diameter pole or wooden dowel mounted in the ground. Pole mounting gives you more control over squirrel-proofing because you can add a baffle directly to the pole.
Materials, tools, and safe setup
What you'll need
- One clean metal coffee can, 26–39 oz or larger (bigger is better for seed capacity)
- Can opener or tin snips for cutting feed openings
- Hammer and nail or a drill with a 3/16-inch bit for drainage holes
- Metal file or 150-grit sandpaper for smoothing cut edges
- 18-gauge galvanized steel wire or zip ties for hanging or mounting
- 1/4-inch wooden dowel, 6–8 inches long, for perches
- Rust-inhibiting spray paint (food-safe when cured, or use on exterior only)
- Clear waterproof sealant or exterior-grade polyurethane for the rim and cut edges
Cleaning the can before you start
This step matters more than people realize. Wash the can thoroughly with hot soapy water to remove all coffee residue and oils, then rinse with a 10% bleach solution (1 part bleach to 9 parts water) and let it air dry completely before adding seed. Coffee oils can repel birds initially, and any moisture left inside will start spoiling seed immediately. Dry time should be at least 24 hours in open air.
Handling sharp edges safely
Sharp cut edges are the biggest safety issue with a metal can feeder, both for you during construction and for birds using it. After cutting any opening, file every edge thoroughly until you can run your finger along it without any catching. Fold the cut edge inward slightly with needle-nose pliers if possible. Apply a thin bead of waterproof sealant along all cut edges to protect birds' feet and beaks from metal burrs, and to slow rusting at those exposed points.
Rust-proofing
Bare metal coffee cans will rust, especially if you're in a humid climate or leaving them out year-round. Spray the exterior with a rust-inhibiting paint, let it cure fully (typically 48–72 hours per the label), and touch up any cut edges with exterior polyurethane or a dab of clear nail polish if you don't want to repaint. The interior is trickier: don't use paint inside where it contacts seed. Instead, apply a thin coat of food-grade mineral oil to the interior walls, which repels moisture without harming birds. Check the interior every few weeks during wet weather and wipe it dry if needed.
Drainage is non-negotiable
At minimum, punch six 3/16-inch drainage holes in the lowest point of the feeder. If you're running a side-port horizontal design, that's the bottom-most part of the curved side. For a vertical open-top design, it's the sealed bottom. Without drainage, a single rainstorm fills the can with water, soaks all the seed, and you've got mold within 24 hours.
Where to place it and how to protect from pests and weather
General placement rules
Place the feeder within about 3 feet of a window (where a collision is slowed and less dangerous) or farther than 30 feet away. The danger zone is 5–30 feet from glass, where birds build enough speed for fatal collisions. A spot near low shrubs or a brush pile gives birds a safe landing zone to retreat to when startled, which makes them more comfortable visiting.
Squirrel and rat prevention
A metal coffee can actually has one advantage over plastic feeders: squirrels can't chew through it. But they'll still raid it if they can physically reach it. The standard guidance from Audubon is to place any feeder at least 8–10 feet horizontally from any surface a squirrel can jump from, including trees, fences, deck railings, and the sides of buildings. If you're pole-mounting, add a squirrel baffle on the pole between the ground and the feeder, positioned 4 to 4.
5 feet above the ground. That height is too high for squirrels to jump over from below, and if the 8-10 foot clearance rule is respected on all sides, they can't leap down onto it either. For rats, don't scatter seed on the ground below the feeder, and clean up spilled seed regularly.
Wasps and insects
Wasps are drawn to sweet seed mixes and to any moisture inside the feeder. If you see wasps investigating, switch to straight black-oil sunflower seed (less sweet), clean the feeder more frequently, and make sure drainage is keeping the interior dry. A thin coat of petroleum jelly on the exterior around the port openings deters wasps without harming birds, but reapply it regularly since it wears off.
Wind and rain
The side-port horizontal design naturally sheds rain from the lid end. Orient the port openings away from the prevailing wind direction in your area. In winter, a coffee-can feeder holds up fine in cold temperatures, but wet snow packing into port openings is a real problem. Check after snowstorms and clear any blockages. The lid being on also matters: a coffee can with the lid intact keeps far more seed dry than an open-top design, which you should only run in dry seasons or under a roof overhang.
Best bird species and how to position for each
A coffee-can feeder is not a universal tool. Knowing which birds it suits best will save you frustration and help you position it correctly.
| Bird Species | Best Feeder Style | Ideal Height | Best Seed |
|---|---|---|---|
| Black-capped Chickadee | Side-port horizontal | 5–6 ft on a pole or hung | Black-oil sunflower, safflower |
| House Finch / Purple Finch | Gravity-slot or side-port | 4–6 ft hung or pole-mounted | Nyjer (thistle), black-oil sunflower |
| White-throated Sparrow | Open-top vertical or ground below feeder | 2–3 ft or ground level | Millet, milo, cracked corn |
| Dark-eyed Junco | Open-top vertical or ground below | Ground or low platform (under 2 ft) | White millet, cracked corn |
| Mourning Dove | Open-top vertical | Low platform or ground | Millet, safflower, cracked corn |
| Nuthatch | Side-port horizontal | 5–7 ft on a pole or hung | Black-oil sunflower, peanut pieces |
| Carolina Wren | Side-port with small port (1.5 in) | 3–5 ft, near brush | Suet crumbles, peanut pieces, sunflower chips |
Cardinals are worth a mention because so many backyard birders want them. A standard coffee can port is often too small and the perch too awkward for a cardinal, which is a large bird that prefers a wide, stable platform. If cardinals are your priority, the open-top vertical design works better, or go straight to a commercial hopper or platform feeder that's built for their size.
Woodpeckers and nuthatches sometimes visit a coffee-can feeder if it's hung from a hook and swings slightly, mimicking the bark movement they're used to. Add peanut pieces or sunflower chips to the seed mix and position the feeder near a tree trunk (but not so close that squirrels can bridge the gap, so at least 8–10 feet from the trunk).
Feeding tips, maintenance, and troubleshooting
What to fill it with
Black-oil sunflower seed is the best all-around choice for a coffee-can feeder. The shells are thin enough for small birds to crack, the kernel-to-shell ratio is high, and nearly every common feeder bird eats it. Avoid cheap mixed seed with lots of milo and red millet, which most birds ignore and just piles up wet at the bottom. If you want to attract finches specifically, add nyjer seed, but note that nyjer pours out of larger openings quickly, so use the narrow gravity-slot design or make the port smaller.
Clogging
Seed clumps and blocks port openings when it gets wet and then dries into a mass. If your feeder is clogging regularly, the drainage is insufficient, the port is too small for the seed size you're using, or you're filling it too full so seed at the bottom sits without moving. Fix: enlarge drainage holes, reduce fill level to 50–60% capacity, and switch to sunflower chips (no shells) which flow more freely than whole seeds.
Mold and spoilage
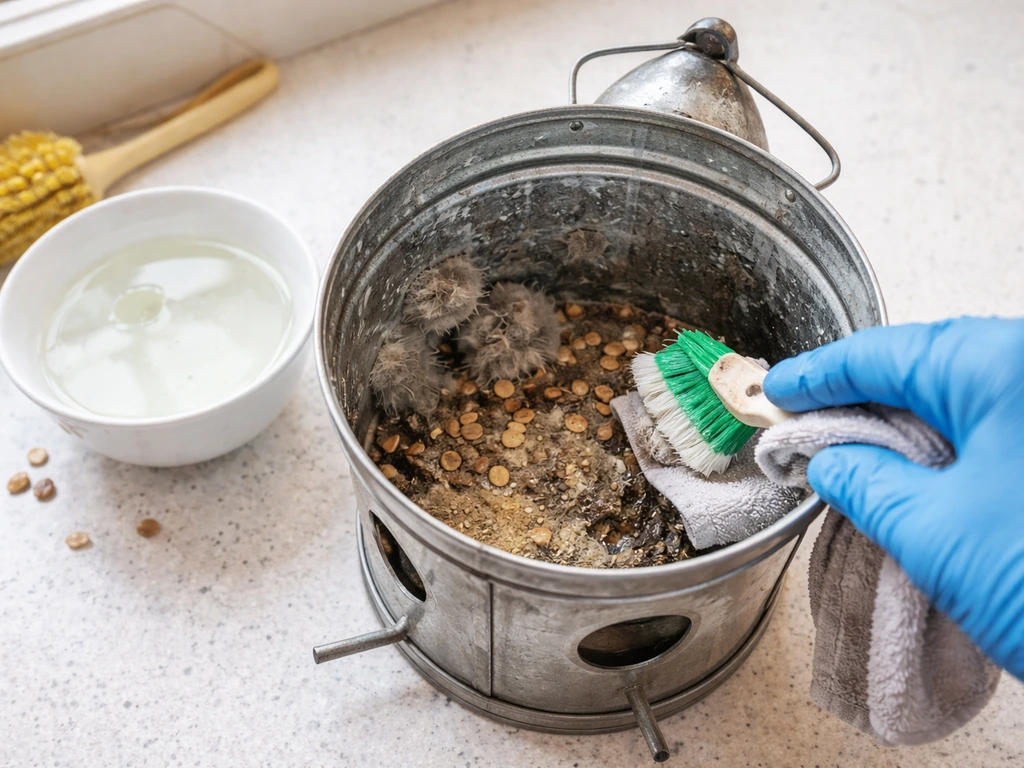
Any time seed smells off, looks gray or fuzzy, or clumps together with no rain having fallen, you've got mold. Dump everything, wash the interior with the bleach solution (1:9 ratio), rinse thoroughly, and let it dry completely before refilling. In warm, humid months (roughly May through September in most of North America), inspect the feeder every 3–4 days and replace seed every week even if it looks fine. In dry winter conditions, seed stays good longer, but still check every 10–14 days.
Rust and corrosion
Surface rust on the exterior is cosmetic. Rust on interior surfaces or around cut edges is a functional problem because it can contaminate seed and weaken the can's structure. Sand any rust spots with 150-grit sandpaper, wipe clean, and reapply exterior polyurethane to edges. If the bottom of the can is rusting through (drainage holes expanding into irregular shapes, metal flaking), retire that can and start with a new one. A well-maintained coffee-can feeder realistically lasts one full season; two seasons with diligent rust-proofing.
Seed spilling
If seed is pouring out when birds land or wind moves the feeder, your port openings are too large or the feeder is swinging too aggressively. Reduce port width by taping metal flashing or a wooden shim to the interior below the opening to create a smaller, angled ledge. For hanging feeders, use a heavier-gauge wire (16-gauge) and shorten the hang length so there's less swing in wind.
Monthly maintenance checklist
- Empty all remaining seed and discard it (do not add fresh seed on top of old)
- Wash interior with hot soapy water, scrub with a bottle brush
- Rinse with 10% bleach solution, then rinse again with plain water
- Inspect all cut edges for rust, sharp burrs, or deformation
- Check drainage holes and clear any blockages with a toothpick or small nail
- Inspect perch dowels for splinters or loosening, re-secure if needed
- Touch up any rusted exterior spots with rust-inhibiting spray or polyurethane
- Let dry fully (at least a few hours in sun) before refilling
Alternatives: when to skip DIY and go with a commercial feeder
A coffee-can feeder is great for getting started, testing a new feeding location, or keeping a budget build in a secondary spot in the yard. But there are real situations where spending money on a commercial feeder is the smarter move.
- Squirrel pressure is intense: A metal can stops chewing, but it won't stop a persistent squirrel from sitting on or inside an open-top design. A commercial weight-sensitive or cage-style feeder handles this automatically.
- You want a specific species: Cardinals need a wide platform, hummingbirds need a nectar reservoir, woodpeckers do better with a suet cage. No coffee-can modification comes close to a purpose-built feeder for these birds.
- You're feeding through winter consistently: Commercial feeders with tight-fitting lids, larger seed capacity, and UV-stabilized or powder-coated metal hold up far better through freeze-thaw cycles than a recycled can.
- Maintenance time is limited: A quality tube or hopper feeder with a wide-mouth opening and removable base takes five minutes to clean. A coffee can, with its tight interior and cut edges, takes more careful handling.
- You want to attract more birds faster: Commercial feeders have larger seed capacity, multiple ports, and better visibility from a distance. Birds find and commit to them more quickly than to a single small can.
If you find yourself refilling and cleaning the coffee can every few days and genuinely enjoying the birds it brings, that's your signal to invest in something more durable. If the coffee can works fine and you're happy with it, there's no pressure to upgrade. The best feeder is the one you actually maintain.
It's also worth knowing that the coffee-can idea has close relatives. A tin can bird feeder uses similar construction logic with even thinner metal (shorter lifespan, but faster build). A plastic coffee can bird feeder is lighter and won't rust, but it's more vulnerable to squirrel chewing and UV degradation.
If you want a larger, more dramatic version of the same DIY concept, some builders adapt a milk can bird feeder for a much bigger seed capacity and a more decorative look. And if you want a quick no-tools option to try with kids before committing to the metal-can build, a Pringles can bird feeder is the lowest-effort entry point.
Each has real trade-offs, but the metal coffee can sits in a solid middle ground for durability and ease of build.
FAQ
Can I use a coffee can feeder year-round, or is it better for seasonal use?
You can use it year-round if you actively manage rust and seed quality, scrape away any interior corrosion, and keep drainage working after every rain or wet snow. In very wet climates, many people switch to a covered mounting spot or do a more thorough drying routine between refills to prevent mold buildup.
How do I choose which seed type to prevent mold and clogging in a coffee can bird feeder?
Start with black-oil sunflower seed, then use whole kernels only if your drainage and port size match the seed. If you see clumps or partial blockages, reduce fill to keep seed from sitting, and consider sunflower chips (no shells) because they flow more consistently and tend to pack less when damp.
What’s the safest way to handle sharp edges after cutting the coffee can openings?
After filing, run your finger along every cut edge in multiple directions, then check for burrs using a paper strip test (a rough edge will catch it). Folding the edge inward helps, but sealant is still worth applying because it adds a protective layer where birds’ feet and beaks contact the metal.
Do I need to put drainage holes in every coffee-can design, even the upright open-top platform feeder?
Yes, drainage is still important for upright designs. Any feeder that can collect rain or melting snow needs holes at the lowest point, and you may need to add a second set of holes if the can’s shape creates a secondary “pooling” area.
How can I make the coffee can bird feeder safer for birds in windy conditions?
Reduce swing by tightening the mounting so the can sits steady, and use heavier wire or a shorter hang length. If you’re pole-mounting, secure it so ports face away from prevailing gusts, since wind-driven sloshing and seed spillage can also increase mold and attract rodents.
Why are no birds using my coffee can bird feeder after I set it up?
The most common causes are contamination from leftover coffee residue, food oils, or moisture trapped inside. Rewash with hot soapy water, sanitize with the diluted bleach rinse, then let it dry fully before refilling. Also give it time, place it near safe perching cover, and start with seed the local birds already eat.
What should I do if water keeps collecting inside the coffee can despite adding drainage holes?
Check that you punched holes in the true lowest point, because some cans have curved bottoms that create hidden pooling areas. Enlarge clogged or misshapen holes, verify the can is oriented correctly, and avoid overfilling so seed is not sitting in damp pockets.
How do I stop squirrels from defeating a coffee can bird feeder?
The fix usually requires access control, not just sturdier metal. Keep the feeder far from jump-off surfaces (including nearby fences and tree branches), use a baffle for pole-mounted setups, and remove spilled seed that provides an alternate food source on the ground.
Are there situations where a coffee can bird feeder is the wrong choice?
Yes. If you want a reliably large, stable platform for bigger birds like cardinals, or you need exact port geometry for a specific species, a designed commercial feeder will outperform a DIY coffee can. It’s also a poor fit where persistent rats are common, because seed spillage and ground feeding can quickly escalate the problem.
How often should I clean a coffee can bird feeder during the warm season?
In warm and humid months, inspect frequently and plan on frequent seed changes, not just quick top-offs. If you notice any sour smell, gray or fuzzy material, or interior dampness, dump and re-clean with the bleach rinse, then dry completely before refilling.
Can I paint the inside of the coffee can to prevent rust or moisture?
Avoid painting the interior if it will contact seed, because flaking coatings can contaminate food. Instead, use a thin coat of food-grade mineral oil on interior walls, and wipe down and reapply if you see moisture returning during wet weather.
What do I do if the seed keeps dumping out too fast when birds land?
That usually means the ports are oversized relative to your seed and fill level, or the feeder is swinging enough to shake seed loose. Reduce the effective port width using a small internal ledge (shim or taped metal flashing), shorten the hang, and keep fill around half to prevent dense packing at the bottom.
Next Article
Tin Can Bird Feeders: Easy DIY Build, Placement and Cleanup
Make and place tin can bird feeders safely with step-by-step DIY, cleanup, and pest-proofing tips for backyard birds.