
An oil can bird feeder is exactly what it sounds like: a repurposed metal oil can, typically a vintage or decorative quart- or gallon-sized tin, converted into a seed feeder by cutting a feeding port, adding perches, and mounting it on a pole or hanging it from a branch. Done right, it makes a genuinely attractive and functional feeder. Done carelessly, it can expose birds to toxic residues that linger inside even a visually clean can. The distinction between a charming upcycled feeder and a health hazard comes down almost entirely to what was inside the can and how thoroughly you've cleaned it.
Oil Can Bird Feeder: DIY Builds, Safety & Best Practices

Marcus Hendricks
6 Aug 2026
What this article covers and who it's for
This guide is written for backyard bird watchers and DIYers who want to build or buy an oil can bird feeder, and for anyone curious about recycled-can feeders more broadly, including aluminum soda and beer cans, soup cans, and other repurposed tins. You'll find safety guidance on oil residues and coatings, step-by-step DIY plans for three different builds, a seed and species guide, and an honest comparison between homemade and commercial feeders. If you're already exploring the wider world of recycled-can feeders, many of the safety and species principles here apply equally to aluminum can and soup can feeders. For step-by-step plans specifically using aluminum soda cans, see the soda can bird feeder guide. See our guide to building a recycled can bird feeder for additional plans and safety tips.
What exactly is an oil can bird feeder?
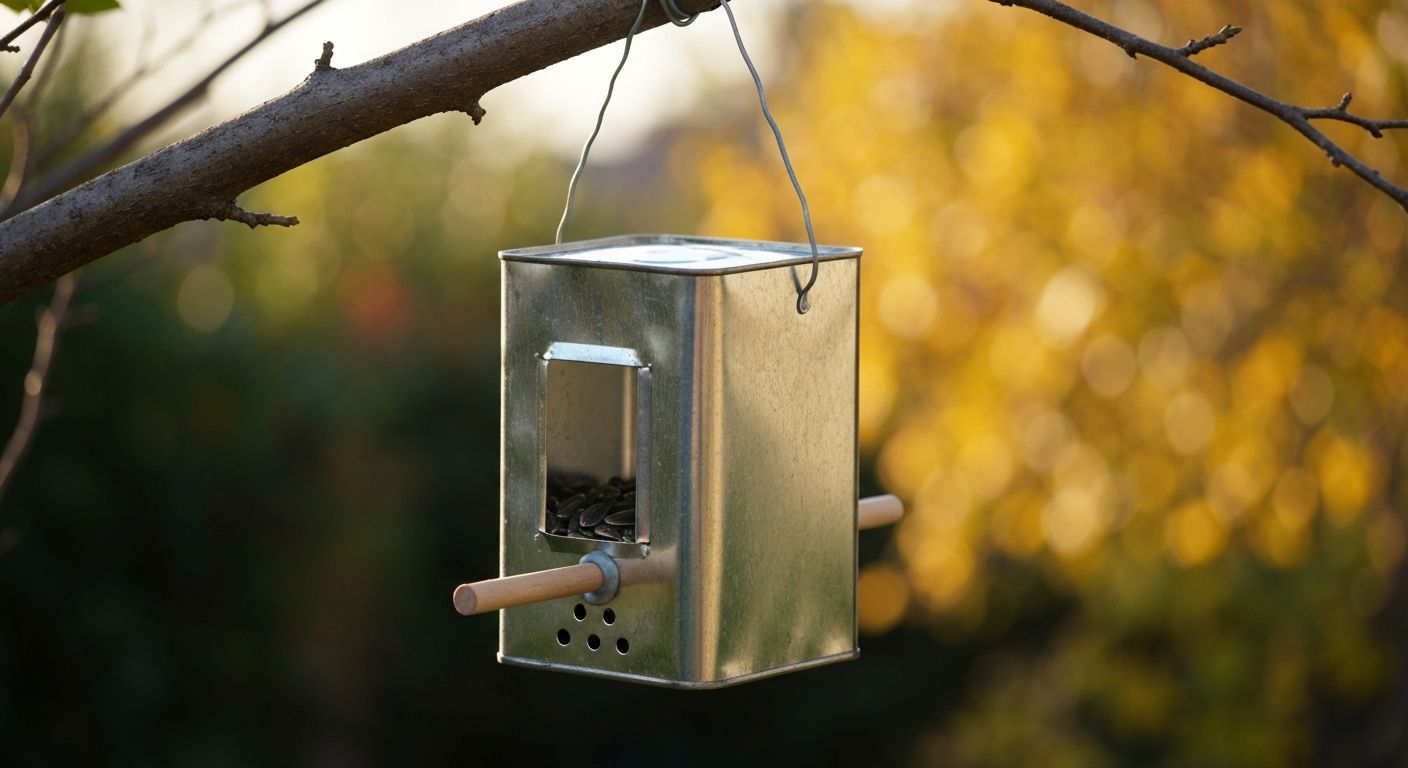
The classic oil can bird feeder uses a vintage-style pressed-steel or lithographed tin oil can, the kind that held motor oil or machine oil in the mid-20th century. Collectors prize these for their graphics, and crafters prize them for their rigid cylindrical or rectangular form, which lends itself naturally to a hopper or tube-style feeder. The most common DIY versions cut a rectangular opening near the bottom third of the can to act as a seed port, add a wooden dowel or branch stub below the port as a perch, seal or drill drainage holes in the base, and hang the can from its original pour-spout end. The result looks more like folk art than a hardware-store feeder, which is part of the appeal.
Beyond the classic tin aesthetic, some builders use modern plastic motor-oil jugs, which are a different and generally safer proposition (no metal corrosion, easier to rinse), but these lack the visual charm that drives most people toward oil cans in the first place. This article focuses primarily on metal oil cans, with comparisons to other metal recycled-can options including aluminum soda and beer cans and tinplate soup cans.
Common shapes and configurations
- Tall cylindrical quart cans: easiest to convert into a tube-style feeder; the narrow profile limits seed capacity to roughly 1 cup
- Rectangular flat-sided quart or half-gallon cans: more interior volume, better surface for decorative painting, easier to mount flat against a post
- Gallon or two-gallon rectangular cans: large enough to function as a small hopper feeder; heavier gauge steel that resists denting
- Vintage pump-style oil cans: functional as novelty feeders but poor seed capacity; better suited to suet cakes than loose seed
The real benefits and honest limitations
The main appeal of an oil can feeder is aesthetic. A well-made version with clean lines, a vintage tin graphic, and a coat of exterior varnish looks genuinely great in a garden setting, and it costs almost nothing if you're using a can you already own. The steel construction is more durable than thin aluminum, resists woodpecker damage better than plastic, and can handle winter temperatures without cracking. If you source a sealed, never-used decorative oil tin (sold at flea markets and vintage shops), the safety math becomes straightforward: no contamination, mild cleaning, and you're done.
The limitations are just as real. Unpainted or uncoated steel rusts, and rust accelerates rapidly when wet seed sits against bare metal. The seed capacity of most oil cans is small, meaning more frequent refilling. The rigid opening makes deep cleaning harder than with a feeder designed to disassemble. And if the can ever held actual motor oil or industrial lubricants, the cleaning requirements are serious enough that many builders should walk away and use a different container, which I'll explain in detail below.
Safety first: oil residues, paints, coatings and food-safe linings
This is the section most DIY guides skip, and it's the one that matters most. Used motor oil is not just greasy: the EPA classifies it as a potential pollutant because it accumulates heavy metals including lead, zinc, chromium, and cadmium, along with chlorinated compounds and combustion byproducts from the engine. ATSDR toxicological reviews of petroleum hydrocarbons specifically note that the toxicity of used crankcase oil often comes from these additives and accumulated contaminants, some of which are associated with serious health effects. A can that looks clean on the inside after a quick rinse almost certainly still has residue in the seams. For a bird feeder, where seed sits in direct contact with the interior surface and where small birds are placing their beaks, that residue is a genuine hazard.
My rule is simple: if a can held used or dirty motor oil, do not use it as a bird feeder regardless of how thoroughly you think you've cleaned it. New, never-used oil cans, sealed decorative tins, or cans that held food-grade mineral oil or cooking oil are a different story, but even those require thorough cleaning before use.
How to degrease a candidate can
For cans that held new (unused) machine oil or light lubricants, industrial degreasing standards point to three proven approaches: solvent cleaning (using a citrus degreaser or acetone on a cloth for residual film), aqueous or alkaline cleaner solutions (hot water with a strong dish soap or purpose-made alkaline cleaner), and steam cleaning if you have access to it. For a DIY feeder build, the practical sequence is: scrub the interior thoroughly with a hot alkaline detergent solution, rinse multiple times with hot water, allow to dry completely, then inspect the seams under bright light. If you can still smell petroleum, repeat the process. Only proceed if the interior is odor-free and visually clean.
Paints, varnishes, and interior coatings
Birds have highly efficient respiratory systems that are uniquely vulnerable to airborne fumes. Avian pathology literature documents rapid, sometimes fatal toxicoses from fumes that would cause only mild irritation in humans, with PTFE (Teflon) fumes being the most widely cited example, but solvent-based paints presenting the same category of risk. Practical avian rescue guidance is consistent: never spray paint near birds, and allow fully painted objects to off-gas in a well-ventilated area for at least several days (some rescues recommend two weeks) before exposing birds to them.
For the exterior of an oil can feeder, a water-based exterior enamel or acrylic paint is the safest decorative option once fully cured. For the interior, the goal is rust prevention without introducing a new hazard. Food-contact epoxy resins do exist (some certified under EU food-contact regulations), but the safety of any epoxy coating depends entirely on using the correct product and following the exact cure schedule specified by the manufacturer. A partially cured or wrong-product epoxy lining is worse than bare metal. If you're not confident in your resin work, the better approach is to leave the interior uncoated, keep it dry, and accept that you'll need to replace the can after a season or two when corrosion sets in.
Materials side by side: oil cans, aluminum cans, and soup cans
Most of the sibling topics in this space, including aluminum can feeders, beer can feeders, soda can feeders, and soup can feeders, share the same category of recycled-can DIY project but differ meaningfully in material properties, contamination risk, and practical durability. For design tips and safety differences specific to aluminum can bird feeders, see the dedicated guide on aluminum can bird feeder (internal link to 2327dd5d-d6e4-484f-a7b7-08f8feefef62). Here's how they stack up.
| Can type | Material | Contamination risk | Corrosion resistance | Structural durability | Best use case |
|---|---|---|---|---|---|
| Vintage/decorative oil tin (new/unused) | Steel (tinplate or lithographed) | Low if never used | Moderate (rusts without coating) | High (heavy gauge) | Hopper or tube feeder, decorative display |
| Used motor oil can | Steel | High (heavy metals, PAHs) | Moderate | High | Do not use for feeders |
| Aluminum soda/beer can | Aluminum | Very low (food-grade contents) | High (aluminum doesn't rust) | Low (thin-walled, dents easily) | Small nyjer or finch feeder; temporary/seasonal use |
| Steel soup/food can (tinplate) | Tinplate with lacquer lining | Low (food contents) | Low (rusts quickly once lining fails) | Moderate | Short-season tube feeder; replace annually |
| Modern plastic motor oil jug | HDPE | Low if rinsed thoroughly | N/A | Low (degrades in UV) | Not recommended; no aesthetic appeal |
The tinplate coating on soup cans deserves a specific note. These cans are lined with lacquers or epoxy-based coatings partly to prevent metal migration into food, and peer-reviewed packaging research confirms that iron and zinc migration increases significantly when those coatings fail, which happens faster outdoors in wet conditions. BPA and its analogs have been found in some older can linings, though reformulation is ongoing. For a bird feeder that will get rained on repeatedly, a soup can's lining will fail within one season in most climates, exposing bare tinplate to moisture and seed. That's not immediately dangerous to birds, but it does mean the can will rust through faster than you expect.
My honest recommendation: if you want a recycled-can feeder that lasts more than a season, a sealed decorative oil tin (bought new or sourced as a genuinely never-used vintage piece) outperforms both aluminum cans and soup cans in structural longevity. If you're making a quick seasonal project, aluminum soda or beer cans are cleaner and easier to work with, even if they dent more easily.
When to walk away from a recycled can
Some situations make any recycled can unsuitable for a bird feeder regardless of cleaning effort. Knowing when to stop is as useful as knowing how to proceed.
- The can held used motor oil, transmission fluid, gear oil, or any industrial lubricant: heavy metal and PAH contamination in used oil is not fully removable by consumer-level cleaning, and the risk to birds is not worth taking
- The can has deep internal rust pitting: pitted surfaces trap contaminants and are impossible to clean thoroughly; flaking rust in seed is not harmful to birds but indicates the can's structural life is nearly over
- The exterior paint is heavily chipped and the paint predates modern water-based formulations: older oil-based and alkyd paints may contain lead, and paint chips in a feeder are a direct ingestion risk
- The can held pesticides, herbicides, solvents, or any chemical not intended for food or lubrication contact: these are non-negotiable disqualifiers
- The interior has visible white mineral deposits or crystalline residue you cannot identify: unknown residues from unknown contents are a red flag
- The can's seams are open, corroded, or show signs of prior leakage: structural integrity affects both safety and function
If a can fails any of these checks, the correct move is to take it to a household hazardous waste facility (for oil-contaminated cans) or recycling, and source a different container. The project isn't worth compromising the birds you're trying to attract.
Three DIY builds: from basic to weatherproof
Build 1: Basic hanging oil can feeder
This is the entry-level build, suitable for a decorative unused quart oil tin. It functions as a small hopper or gravity-fed tube feeder and works well with black-oil sunflower seed or mixed seed blends.
Parts and tools: one clean, never-used quart oil tin; a rotary tool or tin snips; a metal file or sandpaper; one 6-inch wooden dowel (3/8-inch diameter); two-part waterproof epoxy or JB Weld for sealing the perch holes; a 3/16-inch drill bit; exterior water-based enamel paint (optional); 18-gauge galvanized wire for hanging.
- Mark a rectangular seed port on the lower third of the widest face of the can: approximately 2 inches wide by 1.5 inches tall
- Cut the port with tin snips or a rotary tool; file all cut edges smooth and fold any sharp points inward with pliers
- Drill a 3/8-inch hole centered 1 inch below the port for the perch dowel, and a corresponding exit hole on the opposite side
- Thread the dowel through both holes and secure with a small bead of waterproof epoxy on each side
- Drill three 3/16-inch drainage holes in the base of the can
- If painting the exterior, apply two coats of water-based enamel and allow 7 to 14 days of off-gassing in a well-ventilated outdoor space before use
- Thread galvanized wire through the pour spout or around the top seam to create a hanging loop
- Fill with black-oil sunflower seed through the top opening (remove the lid if present, or use the original pour opening)
Build 2: Weatherproof hopper-style from a rectangular oil tin
A rectangular gallon or half-gallon tin gives you enough interior volume (roughly 3 to 4 cups of seed) to reduce refilling frequency and enough surface area to add a small roof overhang that keeps rain out of the seed port. This build is meaningfully more weather-resistant than Build 1.
Additional parts beyond Build 1: a 6-by-8-inch piece of cedar or treated pine (1/4-inch thick) for the roof; four small L-brackets and screws; exterior wood sealant for the cedar; silicone caulk for the roof-to-can junction.
- Follow steps 1 through 4 from Build 1, scaling the seed port to 3 inches wide by 2 inches tall for this larger can
- Cut the cedar roof piece to overhang the front and sides of the can by at least 1 inch on each side; angle the front edge slightly downward if possible
- Seal the cedar with two coats of exterior wood sealant
- Attach the roof to the top of the can using L-brackets screwed into the cedar; run screws through pre-drilled holes in the top of the tin for the brackets on the can side
- Run a bead of exterior silicone caulk along the joint between the roof and the can top
- Mount on a 1-inch diameter metal or wooden pole using a pipe clamp through the back face of the can, or hang using heavy-gauge galvanized wire looped through the top
- Off-gas and fill as described in Build 1
Build 3: Slow-release anti-squirrel variant with slinky baffle
This build adds two features: a slow-release seed port (a smaller opening that lets seed dribble out gradually rather than spilling freely) and a slinky-style baffle on the pole that deters squirrels. For a reliable pole baffle, see recommendations for the best slinky for bird feeder use to ensure the coil fits your pole and holds up to weather. For an alternative that emphasizes gradual dispensing without a slinky baffle, see slow bird feeder designs that focus on low-flow ports and precise seed metering. Research from USDA's National Wildlife Research Center confirms that mechanical barriers including pole baffles with diameters of 16 to 18 inches are among the most reliable squirrel deterrents, and a slinky stretched along the pole below the feeder functions as a secondary mechanical deterrent by collapsing under the squirrel's weight.
For the slow-release port, reduce the seed opening to a vertical slot approximately 3/4 inch wide and 1.5 inches tall. Seed self-meters through this slot based on the seed size, which works particularly well with nyjer (thistle) or millet. For the slinky baffle, thread a standard metal slinky over the pole before mounting the feeder, attaching the top coil to the pole directly beneath the feeder with a zip tie. When a squirrel grabs the slinky from below, it extends and drops, usually releasing the squirrel. Combine this with placing the pole at least 5 feet above ground and 10 feet from any horizontal launching surface (fence, roof, tree branch), as tested placement guidelines from Washington State wildlife agencies recommend.
Mounting, pole, and window options
Oil can feeders are versatile enough to mount several ways. Pole-mounting gives the most pest-control flexibility because you can add a baffle below the feeder and control the height precisely. A standard 1-inch diameter steel shepherd's hook or a dedicated feeder pole with a mounting plate both work; use a pipe clamp or hose clamp to secure the flat back of a rectangular tin directly to the pole. For window mounting, a suction-cup mounting plate can support a lightweight quart tin, but I'd limit this to tins under 1 pound when filled; heavier gallon tins pull suction cups off glass in warm weather. Hanging from a branch using galvanized wire works fine for lightweight builds but gives you less control over squirrel access.
If you're interested in adding a smart camera to monitor your feeder, oil can feeders are compatible with clip-on or stake-mounted camera units as long as the mounting point has a clear line of sight to the feeding port. The compact size of most oil cans means you may need to position the camera slightly above and to the side rather than directly opposite the port.
Oil can vs. commercial feeder: an honest comparison
Before you invest time in a DIY build, it's worth being clear about where commercial feeders outperform homemade recycled-can versions and where the DIY approach actually wins.
| Feature | Oil can DIY feeder | Commercial feeder (e.g., Brome Squirrel Buster) |
|---|---|---|
| Upfront cost | $0 to $15 (materials only) | $30 to $80+ |
| Seed capacity | 1 to 4 cups depending on can size | 3 to 6 cups (tube/hopper styles) |
| Weatherproofing | Moderate (improvised roof); rusts without coating | High (polycarbonate or powder-coated steel) |
| Squirrel resistance | Low without added baffle; moderate with slinky/pole baffle | High (weight-activated mechanisms on premium models) |
| Ease of cleaning | Difficult (rigid interior, hard to reach seams) | High (most premium feeders disassemble fully) |
| Rust/corrosion | High risk after 1 to 2 seasons without coating | Low (purpose-designed materials) |
| Aesthetic appeal | High (vintage, folk-art look) | Functional; limited visual character |
| Repairability | Low (once rusted or dented, replace the can) | High (manufacturers sell replacement parts) |
| DIY customization | Unlimited | None |
| Warranty | None | Lifetime care on some premium models |
My honest take: if your priority is long-term function and low maintenance, a quality commercial feeder beats a recycled-can build every time. The Brome Squirrel Buster line, for example, uses weight-activated mechanisms that work consistently in real conditions, dissassemble for cleaning in seconds, and come with genuine lifetime support. But if you want something that looks beautiful in your garden, costs almost nothing, and gives you a satisfying afternoon project, a well-executed oil can feeder is a genuinely good choice. The two aren't mutually exclusive: many birders I know run a commercial pole-mounted tube feeder for their primary seed station and hang a decorative oil can feeder nearby as a supplementary perch.
Seed guide and which birds you'll attract
Cornell Lab of Ornithology's Project FeederWatch data is consistent on this: black-oil sunflower seed is the single most broadly attractive seed you can offer, drawing chickadees, nuthatches, house finches, cardinals, goldfinches, titmice, and many others. For a small oil can feeder with a narrow port, it's the best default choice. Nyjer (thistle) seed draws goldfinches and siskins specifically, but it requires a port opening no wider than 3/16 of an inch to prevent spillage; the slow-release slot from Build 3 is sized appropriately for nyjer.
Mixed seed blends work but tend to create more waste, because birds sort through the blend and flick less-preferred seeds to the ground, which attracts rodents. In a small can feeder where waste seed piles up quickly, I recommend sticking to a single-species seed to keep the area tidy and reduce pest attraction.
Species by feeder type and season
| Seed type | Birds attracted | Port size needed | Seasonal notes |
|---|---|---|---|
| Black-oil sunflower | Chickadees, nuthatches, cardinals, house finches, goldfinches, titmice, jays | 3/4 inch or wider | Year-round; most active in winter when natural food is scarce |
| Nyjer (thistle) | American goldfinch, pine siskin, redpoll (northern regions) | 3/16 inch slot | Peak demand in winter and early spring; goldfinches shift to it heavily in late summer |
| White millet | Juncos, doves, sparrows, towhees | Wide platform or tray preferred | Fall and winter; ground-feeding species prefer spilled seed anyway |
| Safflower | Cardinals, chickadees; squirrels and starlings tend to avoid it | 3/4 inch or wider | Good year-round option for squirrel reduction without hardware |
A note on species to deter: European starlings and house sparrows are the two species most likely to monopolize a small feeder and crowd out native birds. Starlings struggle with narrow tube ports and cannot use nyjer feeders effectively, so seed selection is your first line of deterrence. House sparrows are harder to deter by seed alone, but they prefer platform and tray feeders over narrow-ported tube styles, so the compact oil can format naturally favors smaller native species.
Seasonal maintenance and troubleshooting
Cornell's wildlife health lab recommends cleaning feeders at a minimum every two weeks under normal conditions, and more frequently during wet weather or if sick birds are observed in your yard. The cleaning protocol that Cornell and affiliated wildlife health units consistently recommend is: scrub with hot soapy water to remove seed debris and droppings, then rinse with a 1:9 dilute bleach solution (one part household bleach to nine parts water), rinse thoroughly with clean water, and allow to dry completely before refilling. The drying step is not optional; moisture in the feeder promotes mold growth, and moldy seed is one of the more consistent causes of bird illness at feeders.
For oil can feeders specifically, the rigid interior makes scrubbing harder than with a feeder that disassembles. I use a long-handled bottle brush to reach the back of the seed compartment. If you find you can't get a brush to the back corners, that's a design problem worth addressing before mold becomes established.
Rust, drainage, and winter-specific issues
Rust is the primary structural threat to any metal can feeder. The drainage holes drilled in Build 1 and Build 2 are essential: seed that sits in standing water against bare steel will rust through the base within a single season. Check drainage holes monthly and clear them with a nail or thin wire if they're clogged with seed debris. In winter, wet snow packing into the seed port can freeze and block the opening; a simple fix is to angle the feeder very slightly forward so the port faces slightly downward, preventing snow accumulation.
If you see significant surface rust forming on the exterior after one season, it's worth stripping the paint or varnish in that area, treating with a phosphoric-acid rust converter, and recoating. If the rust has penetrated through the wall of the can (you can check by pressing gently with a finger; perforated metal will flex inward), retire the can and start fresh. A rusted-through feeder can trap seed in internal cavities where mold grows undetected.
Pest intrusion and rodent management
Rats and mice are attracted to spilled seed below feeders more than to the feeder itself, but they will climb poles and investigate accessible feeders once established. The most effective deterrents are mechanical: pole baffles with a minimum 16-inch diameter placed at least 4 feet above the ground, combined with the 5-foot minimum feeder height and 10-foot clearance from launch points. Capsaicin-treated seed has USDA/NWRC trial support for deterring squirrels, though field performance is variable; birds cannot taste capsaicin and are unaffected. USDA/NWRC trials titled "Effectiveness of Capsaicin as a Repellent to Birdseed Consumption by Gray Squirrels (USDA / NWRC reports)" document dose‑dependent aversion in squirrels but note variable field effectiveness. If you go this route, use commercially pre-treated seed rather than applying raw capsaicin yourself, since inconsistent application can create hot spots that affect seed quality. RSPB guidance also emphasizes spreading feeders to reduce bird congregation, which indirectly reduces the attractiveness of any single spot to ground-feeding rodents.
Buy vs. DIY: a quick decision checklist
Use this checklist to decide before you commit time and materials to a build.
- Do you have a clean, never-used oil tin available? If yes, proceed. If you'd need to buy one specifically for this project, compare the cost against an entry-level commercial feeder first
- Is low maintenance more important to you than aesthetics? If yes, buy commercial; oil can feeders need more frequent inspection and earlier replacement
- Do you have significant squirrel pressure in your yard? If yes, a weight-activated commercial feeder will outperform any DIY recycled-can build without adding a full pole-and-baffle system
- Do you want to disassemble and clean your feeder quickly? If yes, most oil can designs fail this test; commercial tube feeders with twist-off bases are faster to clean
- Is the project itself part of the appeal, whether for you or for a child or beginner? If yes, the DIY build has real value beyond the feeder's function
- Are you planning to leave the feeder up year-round in a wet climate? If yes, budget for replacement cans annually or invest in a weatherproof coating on the exterior before first use
The honest summary is that oil can bird feeders occupy a specific niche: they're excellent as supplementary or decorative feeders, less ideal as your only or primary seed station. Running one alongside a well-designed commercial feeder gives you the best of both, and the oil can will almost certainly attract more compliments from visiting neighbors than the polycarbonate tube next to it.
FAQ
What primary safety research questions are essential regarding oil residues and contaminant risk in recycled oil can feeders?
Identify whether the can previously held motor oil or other industrial fluids; characterize likely contaminants (heavy metals, PAHs, chlorinated compounds). Determine persistence of contaminants in metal substrate and effectiveness of cleaning/degreasing methods to remove residues to safe levels. Assess need for liner or barrier between metal and seed and what food‑safe materials are certified for outdoor use. Source categories to consult: EPA and ATSDR toxicology/regulatory guidance on used oil and contaminants; peer‑reviewed toxicology papers on petroleum hydrocarbon and PAH residues; industrial parts‑cleaning standards and EPA/SSPC cleaning guidance; FDA guidance on food-contact materials and migration testing; manufacturer technical data sheets (TDS) for food‑safe epoxies/coatings and independent test reports.
What must be answered about paints, coatings and off‑gassing risks to birds?
Which paints/primers/resins emit VOCs, and what cure/off‑gassing time is required before safe bird exposure? Which coating chemistries are known to aerosolize into avian-toxic fumes (e.g., PTFE/fluoropolymers or solvent residues)? Establish safe application methods and required ventilation and cure verification steps. Source categories to consult: veterinary/avian pathology literature on inhalation toxicants (PTFE and solvent fume papers); avian rescue and pet‑bird guidance on painting/curing; MSDS/TDS and food‑contact certification docs from coating manufacturers; EPA/OSHA VOC and solvent safety references.
What cleaning, decontamination and reconditioning questions should be researched for reused cans?
Which degreasing/cleaning methods (solvent, alkaline aqueous, steam, mechanical) reliably remove oil and grease to acceptable levels? What post‑cleaning verification (visual, smell, simple wipe tests) is practical for backyard DIYers? Which methods are safe, accessible and environmentally appropriate for home use? Source categories to consult: EPA/industry parts‑cleaning guidance; academic/industry publications on surface decontamination efficacy; extension‑service or municipal household‑hazard‑waste (HHW) guidance on handling used‑oil containers; consumer‑facing cleaning protocols from trusted institutions (e.g., Cornell) adapted for metal parts.
What regulatory and food‑contact chemistry questions must be answered regarding linings and can origins?
Are original can linings (food cans) food‑grade epoxies or unknown coatings? Do reclaimed oil or solvent cans have coatings incompatible with seed contact? What food‑safe liner products exist (epoxy, silicone, stainless steel insert) and what are their certified limitations (temperature, cure schedule, UV durability)? Source categories to consult: peer‑review literature on can‑lining migration (BPA/analogs), packaging‑material reviews; FDA food‑contact material guidance and regulations; manufacturer documentation for food‑contact epoxies/silicones (certificates, cure profiles); recycling/packaging literature on tinplate and non‑food can coatings.
What DIY‑build technical and safety questions are required for each plan (basic can feeder, hopper oil‑can, slow‑release/anti‑squirrel)?
For each plan, specify required parts, tools, protective equipment, safe handling of sharp metal edges, recommended cleaning/prep steps, recommended coatings/liners (with cure/venting), weatherproofing and drainage, and load/weight limits for mounts. Define steps that could produce fumes/sparks and how to mitigate avian and human risks. Determine where photo/diagram prompts are needed for clarity. Source categories to consult: makerspace and metalworking tutorials; extension/4‑H or university DIY safety guides; coating manufacturers' application and PPE guidance; bird‑health advisories for fume avoidance; product pages for hardware components (hooks, swivels, slinky/baffle vendors) for specs.
What species and seed guidance and related research must be compiled?
Which seeds (black‑oil sunflower, nyjer, millet, safflower) are most effective in can/hopper feeders; which feeder designs preferentially attract granivores vs. ground feeders; which species should be avoided or monitored for disease congregation. Include seasonal/regionality differences (migrant finches vs. resident sparrows). Source categories to consult: Cornell Lab (All About Birds), Project FeederWatch data and species–seed mappings; regional Audubon/RSPB/extension guides; peer‑review or extension notes on feeder design vs. species visitation patterns and disease transmission risk.
Next Articles
Slow Release Bird Feeder: Choose, Install, Maintain, DIY
Slow-release bird feeders: reduce waste, deter pests, extend refills, choose, install, or build safe, durable designs.
Aluminum Can Bird Feeder: DIY Plans, Safety & Buying Tips
Step-by-step guide to safe DIY aluminum can bird feeders: designs, prep, species tips, pest-proofing, buy vs build.
Slow Bird Feeder Guide: Types, Setup, Troubleshooting
Guide to slow bird feeders: types, setup, slow-feeding mechanisms, and troubleshooting to deter squirrels